

Accessing and Drawing the Tools on Your Belt
When it comes to your duty belt, the most important question is whether you can get to what you need when you need it.

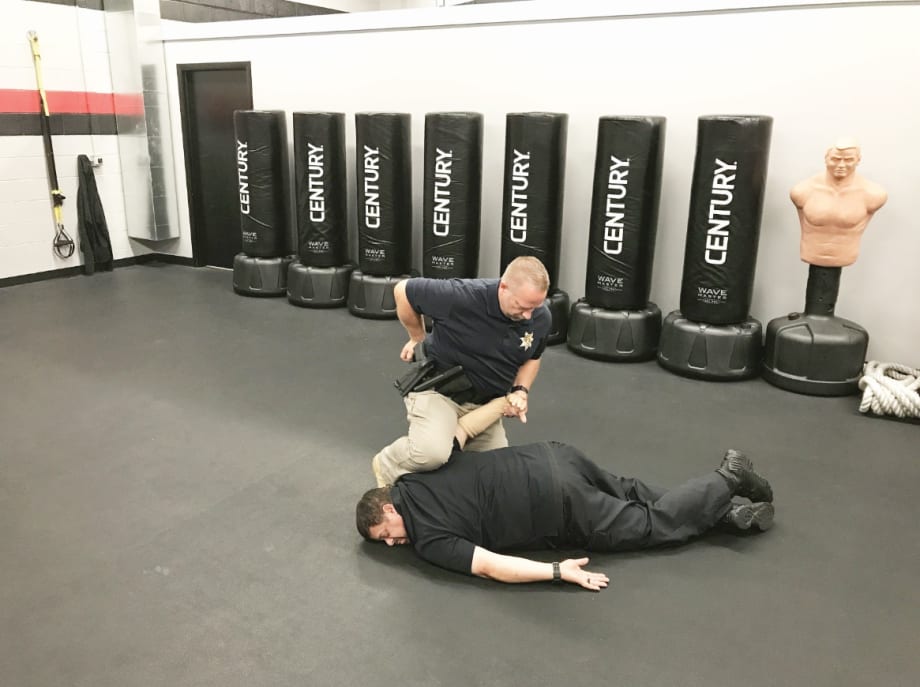
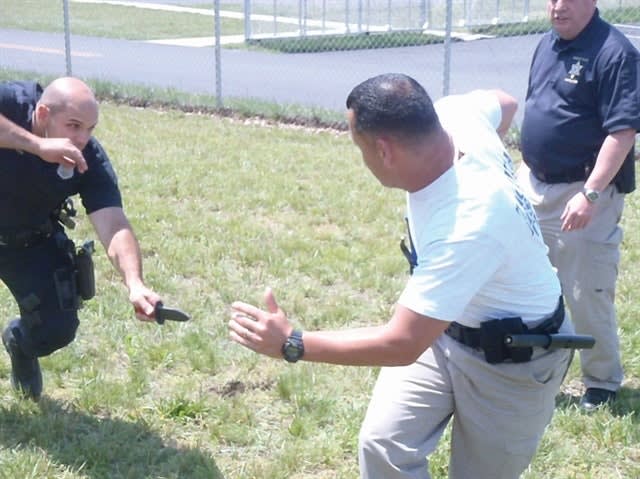
Photo: Anthony Sherman, President of Genesis Group
Over the years, the number of tools on an officer's duty belt has vastly grown from just a baton swinging from baton loops to over 12 different items we need to be safer and more efficient in our jobs. Quickly accessing these tools and getting them in our hands to be effective is an important part of any training program. We will address a few key points in making this action possible, including three essentials. You need to know where your gear is, effectively use movement, and practice.
Key Definitions
First, let's address a few definitions used in training.
"Fine Motor Skills" are needed when using conscious thought (thinking about it) to draw an item out of your holster, carrier, or pouch. An example of this is drawing from a holster that requires you to use your thumb to press a lever downward, before you can move it forward, then use your middle finger to push the lever back as you grab the firearm to rock it back before you can remove it. That is a lot to remember under stress and most often in our training we see officers struggling with "double dipping."
Double dipping means the officer must retry the drawing process, so from the outside looking in it appears the officer is just pulling on the firearm to get it released from the holster.
"Gross Motor Skills" are needed when using unconscious thought (not having to think about it) to draw an item out of your holster, carrier, or pouch. An example of this is drawing from a holster that uses one action as if you were shaking a person's hand before you can remove it. Gross motor skills support the officer's ability to quickly draw their tool from their belt under stress. Most often in training officers accessing and drawing their tools this way don't struggle with "double dipping."
Gear Placement
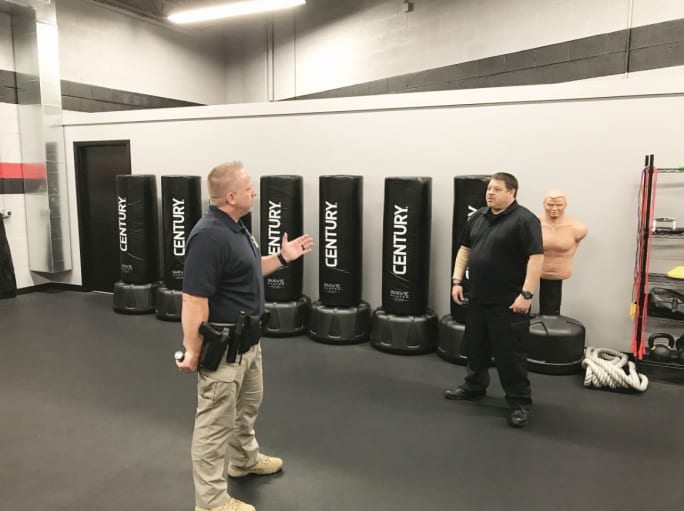
Train to know where your baton and other tools are by feel and get comfortable drawing them while interviewing a "subject." Photo: Anthony Sherman, President of Genesis Group
Placement of your gear is vital to the drawing of any piece of equipment on your belt. Most often your agency will tell you where you are expected to place each piece of gear on your duty belt, despite your personal preferences. So becoming familiar with your gear is critical, especially in times of duress.
A basic rule of thumb when placing your gear on your duty belt is to avoid placing anything directly behind your firearm. You can accomplish this by placing two to three belt keepers behind the firearm to avoid any other piece of gear that may prohibit your ability to draw your firearm from sliding behind it. This is a safety issue that you do not want to test for the first time out in the field. If you need to draw your firearm to protect yourself or someone else, it's imperative that nothing prevent you from accessing it.
Knowing where your gear is, and ensuring it is placed in a position you are familiar with, accounts for one-third of the action needed to draw it.
Movement
The next third of an effective draw is movement, and this is a must.
In most situations when any officer draws gear from their duty belt there is a certain amount of movement needed in concert with the drawing motion. For drawing your firearm, movement to cover is important. "If you do not move when you draw in most cases you will be dead where you stand!" is a quote I share with everyone attending my officer survival course.
Basic patterns of movement are designed to create distance between you and your threat and need to be practiced in conjunction with accessing your gear and drawing it.
5 Basic Patterns of Movement:
Lateral Movement (right to left or left to right)—This side-to-side movement is often referred to as "getting off line." The practice is, as you step to the side with your first foot that touches the ground you have already unsnapped your gear from the carrier, and before your movement has stopped you have drawn your gear from your belt.
Backward Movement (stepping to the rear 2-3 steps)—This rearward movement is often referred to as "retreating." The practice is, as you step to the rear and when your first foot touches the ground you have already unsnapped your gear from the carrier, and before your movement has stopped you have drawn your gear from your belt.
Taking the Line Movement (forward off shoulder of subject)—This forward movement is often referred to as "taking the line." The practice is, as you step to the forward off shoulder of the subject and when your first foot touches the ground, you have already unsnapped your gear from the carrier, and before your movement has stopped you have drawn your gear from your belt.
"Tactical L" (2-3 steps to the rear and then 3-4 steps laterally)—This movement is often referred to as "Tactical L." This tactical movement creates distance by your moving to the rear then immediately moving to the side to get off line. The practice is, as you take your two to three steps to the rear you have already unsnapped your gear from the carrier, and before you begin your movement laterally you have drawn your gear from your belt.
Fading Movement (stepping to the rear at a 45-degree angle off your shoulder)—This movement we refer to as "Fading" right/left. It is a 45-degree rearward movement to diagonally. The practice is, you step off shoulder to your rear at a 45-degree angle, and when your first foot touches the ground you have already unsnapped your gear from the carrier, and before your movement has stopped you have drawn your gear from your belt.
Practice
The last third of an effective draw is practice. Here are a few practice drills to improve your skill in accessing and drawing your gear, with and without a partner.
Approaching Subject Exercises:
As you approach your location, practice accessing your gear and going to a low-profile carry. Start 10 feet from the subject. You can do this exercise by yourself using a chair to stand in for the subject. Place the chair in several different environments while you practice the drill in all possible positions like standing, kneeling, sitting, ground, prone, supine, etc.
With a partner you can either approach the partner or have them walk toward you to help you gauge at how fast a pace someone may be walking toward you.
When You Make Initial Contact:
When you are verbally engaging your subject for an interview, statement taking, or while gathering information, start 5 feet from the subject. Practice drawing your gear in this situation. Again, you can do this exercise using a chair to stand in for a subject and place the chair in several different environments while in all of your positions like standing, kneeling, sitting, ground, prone, supine, etc.
When conducting this exercise with a partner you can either have them move toward you or you can move toward them to help you gauge at how fast a pace someone may be moving toward you.
When You Make Contact:
When you are operating, as in patting down a subject, receiving their identification, or making an arrest, start 2 feet from the subject. Use a chair again as a subject and place the chair in several different environments while practicing drawing gear from your duty belt in all positions: standing, kneeling, sitting, ground, prone, supine, etc.
With a partner you can either have them move toward you or move toward them to gauge at how fast a pace someone may be moving toward you.
Suggested Environments for Exercises:
Inside your home so you can simulate a domestic situation
Outside on different types of terrain to simulate a traffic stop or approaching a subject
Sitting inside your car or office chair
Wearing a cold weather jacket and gloves as you approach
Wearing rain gear, poncho, or rain coat as you approach
Taping your index finger, thumb, or pinky finger to simulate a broken finger or injury
Alternating your eyes open and closed to simulate debris or impaired vision
Change your foot placement to simulate being on uneven terrain
Accessing and Drawing Under Controlled Stress
When building a skill you first must define the goal. If accessing and drawing your gear under stressful and ever changing conditions is your goal, then you will need to place more mind and vision distractions in your drills. In my training courses we use a tennis ball as the mind distraction to add the urgency of time and create a level of realistic stress. You should be standing with all of your duty gear and a safe and clear firearm (meaning no ammunition is on your body and the firearm has a train safe orange blocker inside the barrel or you are using safe and inert training props).
Below are examples of drills you can conduct with each item on your duty belt.
Examples of Access and Drawing Drills:
Firearm—In the standing position, holding the tennis ball in your support hand, toss the ball up into the air arm-high. Quickly access and draw your firearm before you catch the ball, as a way to add time urgency.
Magazine Pouches—In a kneeling position, holding your (clear and safe) firearm in a low-profile carry position, and the tennis ball in your support hand, toss the ball up into the air arm-high. Quickly access and draw your magazine and load (your unloaded) magazine into your firearm before the ball bounces the second time.
Baton—While running in place, holding the tennis ball in your support hand, toss the ballt up into the air arm-high. Quickly access and draw your baton, extend it, and hit the ball before it bounces the second time.
Chemical Aerosol Sprays (OC)—While standing and holding the tennis ball in your support hand, toss it up into the air arm-high. Quickly access and draw your OC unit before you catch the ball.
Electronic Device—While standing and holding the tennis ball in your support hand, toss it up into the air arm-high. Quickly access and draw your electronic device before you catch the ball.
Handcuffs—While standing and holding the tennis ball in your support hand, toss it up into the air arm-high. Quickly access and draw your handcuffs in a loaded position before you catch the ball.
Flashlight—While standing and holding the tennis ball in your support hand, toss the ball up into the air arm-high in front of you. Quickly access and draw your flashlight and shine the light on the tennis ball before it bounces the second time.
Keys—While standing by your car, holding the tennis ball in your support hand, toss the ball up into the air arm-high. Quickly access your car keys and place them inside the key hole before the ball bounces the second time.
Dave Young is the founder and director of Arma Training, responsible yearly for training thousands of police, corrections, and military instructors around the world on surviving force-on-force attacks. He is also the co-founder of Vistelar. Young graduated from his first law enforcement academy in 1985, and has over 30 years of combined civilian and military law enforcement experience and training. He is a long-serving member of the POLICE Advisory Board.
More Training
Safariland Solis Rethinks Concealable Duty
What if Level I retention didn’t require a full duty rig? Safariland’s Solis delivers trusted ALS security in a streamlined OWB platform built for administrative and plainclothes professionals who need protection without the bulk.
Read More →
Two-Officer Tactical Doorway Entry Techniques
Entering a room during active-threat situations requires communication, coordination, and disciplined tactical movement. In this video, trainers from the United States Deputy Sheriff’s Association demonstrate critical room entry concepts, including fatal funnel awareness, team coordination, and safe tactical movement.
Read More →
High Compressed Ready Explained | Muzzle Control For Room Entry
In this video, Mike Willis, law enforcement national training and program director for the United States Deputy Sheriffs’ Association, demonstrates the high compressed ready position and discusses muzzle control during room entry.
Read More →

Built for Patrol: How One Police Chief Fixed Communication, Boosted Visibility, and Changed the Culture
Patrol work hasn’t changed—but the expectations on officers have. See how one police chief helped officers get the right information at the right time, improve patrol visibility, and strengthen trust without adding complexity or surveillance. This real-world story shows how patrol-driven technology can make the job safer, smarter, and more effective—starting on day one.
Read More →
Why Attend the DroneSense Innovation Summit by Versaterm?
Let’s hear from Ryan Bracken, head of product, about why your agency should send someone to the first annual DroneSense Innovation Summit by Versaterm in April.
Read More →
Caswell Live Fire Spins Off from InVeris
Caswell Live Fire has spun off from parent company InVeris, coinciding with the 100th anniversary of Caswell’s founding. Over the past 100 years, Caswell has developed pioneering solutions that support military, law enforcement, and commercial clients worldwide.
Read More →
When Do You Transport a Wounded Officer Instead of Waiting for EMS?
Thumbnail for video series POLICE Topics, Tactics & Tips with a yellow headline that reads When Do You Transport a Wounded Officer Instead of Waiting for EMS?
Read More →
How to Pick Your High-Risk Stop Location for Tactical Advantage
Hear veteran trainer Mike Willis, of the United States Deputy Sheriff’s Association, explain several considerations that can help you wisely pick your best spot to initiate high-risk or felony traffic stops.
Read More →
Coffee Break with Police Experts: Using Your Patrol Vehicle for Cover
In this video, hear from Dustin Mowery, a product specialist at Team Wendy, as he discusses how to best use a patrol vehicle for cover.
Read More →
Preventing Blue-on-Blue Shootings
In this video, Mike Willis, law enforcement national training and program director, United States Deputy Sheriff’s Association, discusses how to prevent blue-on-blue shootings.
Read More →