

Reacting to Gun Grabs
In addition to the built-in retention of your holster, there are some techniques and tactics that you need to know in order to keep your duty weapon in place during a physical altercation.
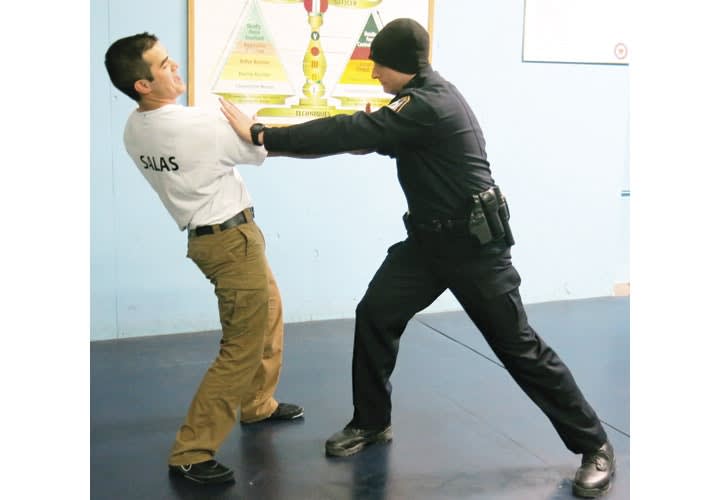
Photo: Michael Schlosser
Weapon retention obviously begins with the holster. The more secure your holster, the less likely an assailant will be able to remove your weapon and use it against you.
Many officers don't devote enough thought to the holsters they use, often simply using the ones issued to them by their departments, but you need to give your holster some consideration. There are different levels of retention available, and the more difficult it is for the assailant to remove the weapon, the better.
Also, in addition to the built-in retention of your holster, there are some techniques and tactics that you need to know in order to keep your duty weapon in place during a physical altercation. However, before we begin discussing these techniques and tactics, it's important for you to know that if someone is trying to take away your gun—whether it's in your holster or your hand—that person is a deadly threat. Therefore, you can use everything up to and including deadly force to end that threat.
Stay Standing
The last place you want to be when someone is attempting to disarm you is on the ground. If at all possible, stay upright and try to disengage from the assailant.
One of the best ways to remain upright is to immediately establish a solid base under you as the assailant grabs your weapon. This can be accomplished by assuming a wider stance and bending your knees. A wider base is stronger, and by having your knees bent, you are in a more athletic stance and prepared to move in this very dynamic situation.
Hands On
If someone grabs your gun, it is critical that you react immediately and place one or both hands on the weapon to keep it in your holster. You probably all learned this technique in the academy. It's a pretty simple counter for any gun grab, and in most cases it should be your first move. If an assailant is attempting to pull your weapon, use your hand or hands to force downward pressure onto the weapon to prevent yourself from being disarmed.
Before practicing disengaging, perform repetitions of combining these first two steps into one movement. Practice with other officers using Blue Guns or other non-firing replicas. Never practice gun grabs with your real firearms.
The goal for this training is to make your reaction to a gun grab nearly automatic. Whenever contact is made with your weapon, react instantly, immediately build a base, and get one or both hands to the weapon, forcing it downward.
Keep in mind that if the assailant is using one hand in the attempt to access the weapon, then you can use two hands to keep the gun in the holster and gain an advantage.
For this drill, the participant designated as the officer stands with hands above the waist and weapon side back, just as if conducting an interview with a subject who is in front of the officer. The exercise begins with the "assailant" making contact with the weapon (without trying to remove it initially). Upon contact, the officer needs to establish a base and get a hand or hands on the weapon.
Twisting Away
By using a simple technique, there is a very good chance you will be able to disengage while keeping both hands on your weapon, adding to the security of retention. This can be accomplished by either twisting or pivoting in a tight motion toward the weapon side while remaining close to the assailant. It is difficult for someone to maintain a good grip on your weapon during this movement.
If securing the weapon and twisting away does not allow you to disengage, then take one hand off your weapon and attack the assailant.
Which hand you use to go on the offensive will depend on which side the assailant is on. If the assailant is on your strong side, then remove his or her corresponding hand while keeping control of the weapon with your weak-side hand. If the assailant is on the weak side, then remove your corresponding hand while keeping control of the weapon with your strong-side hand. When you go on the attack with your free hand, target the assailant's face, throat, arm, and groin.
Gain Distance and Recover
Once the assailant is no longer grabbing your weapon, push him or her away and create distance by moving away from the attack. Gaining distance is crucial. It allows you to safely draw your handgun from your holster at a distance that your attacker cannot grab it or you.
Any attempt by an assailant to disarm you, as we've discussed, is a deadly force situation. However, once you have created distance between you and the attacker, it is possible for the situation to develop into a cooperative subject arrest. For example, once you are pointing your firearm at the assailant, this may cause him or her to cooperate. If that is the case, then give the assailant simple, direct, and loud commands. These include:
"Get your hands up."
"Keeping your hands up and away from your body, go down to your knees."
"Keeping your hands up and away from your body, go onto your stomach."
"Put your arms out to your side, palms up."
"Look to your right or the left" (forcing the arrestee to turn his or her head away from the officer).
If, however, the subject continues toward you and does not cooperate, then based on your perception this would very likely remain a deadly force situation. You need to stop the threat, which of course would justify you shooting the assailant.
Making the Arrest
Once the attacker cooperates and is proned out, wait for backup before attempting to handcuff him, even if this means waiting for quite some time. It can be extremely risky to attempt to handcuff someone who was attempting to disarm you because it could trigger a second fight, maybe even another fight over your gun.
There are many techniques and useful tactics for handcuffing such a high-risk arrestee. Considerations when prone cuffing include: approaching safely, gaining control, and cuffing. Options include having a cover officer approach the subject with a firearm out while the cuffing officer holsters his or her firearm. If the officers approach together on the same side and remain at the same distance during the approach, then the risk of crossfire is reduced. Once the officers have approached the arrestee, then the cover officer should remain standing with firearm drawn, while the cuffing officer gains control of the arrestee. As always, the arresting officer needs to check the cuffs for proper fit and double-lock them. The arresting officer may then conduct a search while the arrestee is on the ground and can always conduct another search once the arrestee is standing.
Preventing a gun grab is easier than stopping one. Remain aware of your surroundings and habitually maintain a safe distance from anyone with whom you are interacting. And remember to keep your weapon side back and your hands above their waist.
However, even if you take every appropriate precaution, you can still be attacked by someone who is determined to take your gun and use it on you. So practice weapon retention drills to prepare for the worst case scenario.
Dr. Michael Schlosser is a retired lieutenant with the Rantoul (Ill.) Police Department, director of the University of Illinois Police Training Institute, and the Institute's lead control and arrest tactics instructor.
Michael "Ben" Toberman is a sergeant and K-9 officer with the Taylorville (Ill.) Police Department and a master arrest and control tactics instructor with the University of Illinois Police Training Institute.
More Training
Tools for Active Shooter Response Training
What technologies help prepare officers for active shooter response situations? This behind-the-scenes look at law enforcement training explores shot simulators, smart firearms, laser target systems, and the tools used to build safer, more effective training environments.
Read More →
Two-Officer Tactical Doorway Entry Techniques
Entering a room during active-threat situations requires communication, coordination, and disciplined tactical movement. In this video, trainers from the United States Deputy Sheriff’s Association demonstrate critical room entry concepts, including fatal funnel awareness, team coordination, and safe tactical movement.
Read More →
High Compressed Ready Explained | Muzzle Control For Room Entry
In this video, Mike Willis, law enforcement national training and program director for the United States Deputy Sheriffs’ Association, demonstrates the high compressed ready position and discusses muzzle control during room entry.
Read More →
Why Attend the DroneSense Innovation Summit by Versaterm?
Let’s hear from Ryan Bracken, head of product, about why your agency should send someone to the first annual DroneSense Innovation Summit by Versaterm in April.
Read More →
Caswell Live Fire Spins Off from InVeris
Caswell Live Fire has spun off from parent company InVeris, coinciding with the 100th anniversary of Caswell’s founding. Over the past 100 years, Caswell has developed pioneering solutions that support military, law enforcement, and commercial clients worldwide.
Read More →
When Do You Transport a Wounded Officer Instead of Waiting for EMS?
Thumbnail for video series POLICE Topics, Tactics & Tips with a yellow headline that reads When Do You Transport a Wounded Officer Instead of Waiting for EMS?
Read More →
How to Pick Your High-Risk Stop Location for Tactical Advantage
Hear veteran trainer Mike Willis, of the United States Deputy Sheriff’s Association, explain several considerations that can help you wisely pick your best spot to initiate high-risk or felony traffic stops.
Read More →
Coffee Break with Police Experts: Using Your Patrol Vehicle for Cover
In this video, hear from Dustin Mowery, a product specialist at Team Wendy, as he discusses how to best use a patrol vehicle for cover.
Read More →
Preventing Blue-on-Blue Shootings
In this video, Mike Willis, law enforcement national training and program director, United States Deputy Sheriff’s Association, discusses how to prevent blue-on-blue shootings.
Read More →
What Officers Should Have in Their IFAK
Sydney Vail, M.D., explains what officers should carry in their IFAKs, the importance of carrying two tourniquets, and the necessity of locating medical gear in a location that can be easily accessed with either hand.
Read More →