 Photos: ASP
In the last 12 months, a number of officers who believed the suspects in the back of their vehicles were restrained and thoroughly searched for weapons have come under attack as these men and women slipped their cuffs and produced hidden pistols. From these events It’s become clear that some officers are taking for granted handcuffing and searching.
Ask yourself when was the last time you trained on handcuffing. I would venture to say that unless you are a defensive tac-tics person, the answer to that question is rookie school. Veteran officers say the tool used most every day on the job hasn’t been trained on since the academy. In today’s world the handcuff is just as valuable as it was 20 years ago, but with the scrutiny officers presently face it’s even more important that you get handcuffing correct.
Improper handcuffing can lead to a trip to internal affairs and into the inside of a courtroom. These lawsuits range from tens of thousands of dollars into the multimillion-dollar arena. Worse than IA and court is being injured or killed due to faulty technique or a bad search. Although there are many different “styles” of handcuffing, there are basic principles that must be followed each time.
Handcuff Myths
As we begin this discussion, I need to address a couple of myths that we continue to feed both tenured and rookie officers.
The first myth that you have probably heard or may have recited yourself is: “It doesn’t matter how the cuffs go on, just get the cuffs on.”
Think about the premise behind this statement. Most officers cuff with their dominant hand. You place the first cuff on the subject and now some type of resistance occurs, and the subject is no longer compliant. You subscribe to the myth and now you are trying to “just get the cuffs on.” Distraction techniques? Disengage? Escalate to another tool on the belt? No, many officers adhere to the myth of what their trainer told them, and they chase the cuff and prolong the fight.
When resistance occurs, officers need to abandon the cuffing process. Yes, I said that. The subject has chosen to resist and fight and you are no longer handcuffing, you are now gaining compliance from a subject who is resisting. When resistance begins, the handcuffing process ends and the act of gaining compliance must take priority. You have tools on your belt to gain compliance, and your handcuffs are not one of them. A handcuff is nothing more than a temporary restraining device. You fight or you cuff; you do not do both.
The second myth is that a handcuffed subject can’t hurt you. There are too many officers on that sacred wall in Washington, DC, who were killed by someone in handcuffs. Handcuffs are a temporary restraint and the subject cuffed must be kept under observation. People escape from cuffs. People fight when cuffed. Give a subject enough time and opportunity and they may be motivated enough to get out of a set of handcuffs.
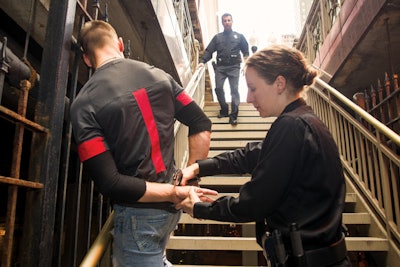
 Positioning the cuffs in the front of your body can make them easier to access.
Accessing Your Cuffs
Proper cuffing begins with properly wearing your cuffs on the body. I am going to say something that may seem a little strange to many of you. Placing the cuffs in the front of the body on the firearm side can assist you when cuffing your subject.
Why? With firearms, you do all of your work in front. You carry your magazines in front, you reload in front, you clear mal-functions in front. You do this because of the necessity for speed and the need to have important tools in front. You are strong-er here and can work more efficiently. With cuffs, the reasoning is the same.
Most times, the subject you are dealing with is not being arrested for the first time. They know when you tell them to turn around and put their hands behind their back that they are going to jail. When they hear that snap or that Velcro give way, they know it’s game time. Why would you want to give them an advantage and have your dominant hand behind your back when they choose to fight?
A second reason for keeping the cuffs in front of the body is it helps your longevity and health as an officer. With the cuffs in front, you are not sitting on the cuffs with the case pressing against nerves in your back and hips. There are two types of cops: those with back problems and those who will have back problems.
If you still want to wear your cuffs in back, it’s not going to keep you from handcuffing properly. But I implore you to do one thing, wear a couple of double belt keepers in the center of your back. This will keep your cuffs off your spine in case you fall, which can prevent a serious back injury.
No matter where you carry them, align the cuffs so that the bow (swing through ratchet) is facing toward your belly button and away from the spine.
Proper Technique
Once the decision is made to effect the arrest, you should always handcuff the subject.
Proper stance is paramount and sets you up for success in this action. Think of your stance as a pyramid. You must have a wide base, a deep base, a low center and your head over your center. The wide base (feet shoulder width apart) gives you stability side to side. The deep base (feet usually one step apart) gives you stability front to back, a low center (knees slightly bent) gives you stability from angles and the head over center allows you to maintain proper balance.
Next, position the subject. Verbally instruct the subject to turn around. Handcuffing should be done behind the back, under normal circumstances with chain or hinge cuffs, with the palms facing outward away from one another.
Instead of directing the subject into an airplane stance or readying them for a football stance, tell them to do the opposite of how you positioned yourself. Tell them to “Turn around, put your feet together, lean forward and place your hands behind your back.” In this position, to run or fight they have to make an overt action that you will see or feel when making contact. Instead of having them widen their feet and get a good base or readying them to fight with you, decentralize the subject and put them at a disadvantage.
Ensure you can see their palms. Officers do not get stabbed or shot when you can see a subject’s palms. If you cannot see their palms, you are not in a safe place. With the subject positioned properly, you approach the subject from a rearward 45-degree angle. This decreases the amount of personal weapon systems they physically have to use against you. Do not get out your cuffs until both you and the subject are in the correct position.
Present or draw your cuffs. The cuffs should be held in your weapon hand with a full hand grip. All the slack should be taken out of the cuff so that it can be solidly and rapidly applied to the subject’s wrists.
Understand that most people you will deal with on the street are right-handed. Controlling the dominant hand is optimal. Lefties must be cognizant of this fact if you choose to cuff from the left side. Your cuffs will be staged in your weapon hand, so the bow is facing outward toward your subject. Approach your subject. Control the hand from the side you approach with your reaction hand (this is the hand closest to your subject and the first you react with if attacked). This control is acquired by sliding your palm to the back of their hand and rotating the subject’s thumb to the sky as you slightly pull the arm away from their back. Done properly, this will create a “C” like lock out in the arm and expose the ulna and wrist.
With the bottom (pinky) cuff, using a downward 45-degree-angle motion from shoulder to hip, place the bow of the first cuff against the wrist just above the hand. Push the cuff onto the wrist cycling the bow rocking the cuff into place. Reach across to the remaining hand and grab the meaty portion of that hand. This is done to keep the subject from grabbing your hand with all their strength. Pull the unsecured arm toward you while rotating the thumb skyward exposing the ulna and the wrist. Place the bow of the top cuff against the wrist and then push the cuff locking it into place.
Once the subject is handcuffed, you want to tighten the cuffs tight enough to ensure the cuff does not slip up or down the arm but not so tight to impede blood flow or cause nerve damage. The typical rule is a fingertip could be placed between the bow and the wrist.
Your last step in proper handcuffing is to always, and I mean always, double lock the handcuff. This keeps the cuffs from tightening as the subject sits on them, and it makes it more difficult for a subject to shim the cuff if they were to try to escape.
 The same cuffing position works when subjects are standing, kneeling, or prone.
So, what about cuffing a kneeling or prone subject? What changes? How many different techniques do you need to learn? The answer is one. The proper way to cuff works for standing, kneeling, and prone subjects.
The only thing that changes is how low your center goes. Squat down to the level of the subject and use the same principles as you would use for a standing subject. Stabilize the subject, use proper approach, rock the first cuff on and lock the second cuff in place, tighten, double lock the cuffs, and properly search your subject. If the subject is prone, do not put your weight on them, just get your squat on.
Searching the Subject
Once a subject has been cuffed, cuffs properly tightened, and double locked; you should search the subject. Searches should be done systematically and the same way every time so that no portion of the body is missed. Nobody is above reproach, and everyone gets searched as if your life depends on it. Take prisoner property bags with you into the field. Every search is done to fill the bag.
Systematically begin with high danger areas where a weapon might be concealed. Use your hand to knead the clothing. I do not care how uncomfortable it makes the subject feel because your life depends on good searches being completed.
After the high danger areas, begin searching by quadrants, knead the clothes and remove all property to immediately be placed in the property bag. No subject retains any property. This will keep you from accidently missing an area containing a weapon or contraband.
It is almost like Halloween. An empty bag means you did a bad job. Do not search for guns or drugs, search for items the size of a handcuff key. If you can find those items, you will not miss a gun or contraband. When passing a prisoner off to an-other officer, demand they search the prisoner in front of you. This is the same when you take someone else’s prisoner. If you didn’t search them, they do not ride in your car.
Unhooking Them
Once at your final destination, the handcuffs should be removed. This is done by last on, first off to keep that wicked dominant hand restrained as long as possible.
Stabilize the subject by placing their feet together and have them lean slightly forward so their head is not over center. Remove the last cuff placed on the subject and direct them where to place the free hand. I always had them put it behind their back. It was safer for me. Close the bow on the first cuff. There are no dangling bows. A bow can be a very dangerous edged weapon against you. Stop worrying about the key in the cuff, just close the bow and focus on the subject.
Unlock the first cuff that was placed on the subject and step back to that same rearward 45-degree angle while closing the bow on the last cuff. Watch your subject. Document any injuries and that the cuffs were checked for proper tightness and double locked.
Daryell Harmon is the vice president of sales for ASP. He served 16 years in law enforcement, serving with the Dallas Police Department and rising to the rank of sergeant. He has experience as a defensive tactics, less-lethal weapon, riot control, and police driving instructor.


