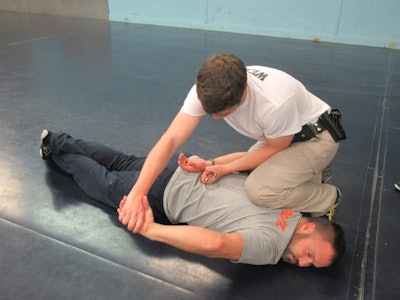
 Should the arrestee begin to resist, maintain control by driving the arm downward and apply pain compliance through the wrist manipulation. That said, no tactics work every time; be aware that the control officer may need to disengage.Photo: Michael Schlosser
It is stressful for officers to conduct a high-risk arrest. However, training and repetition will give officers confidence when such a situation arises. Tactically, if possible, officers should be behind cover, and ideally three or more officers will be present. Two officers can manage a high-risk situation, if necessary. Officers must communicate with each other so they know their individual roles. Even better, officers who work together should train together to help avoid confusion.
Since high-risk arrests may require the use of deadly force, you should draw your pistol, keeping your finger on the locator along the side of the frame of the pistol. Hold the pistol at the high ready, with line of sight just above the sights of the pistol; focus on the suspect, with the sights in secondary vision.
At this point in the arrest, the suspect is not an immediate threat, so keep the suspect, and not the pistol sights, in primary vision and sharp focus. Should the need arise, you can quickly raise the pistol slightly, adjust your focus to the sights, and attain a sight picture for a shot. If you keep the pistol within your line of sight instead, you will be focused on the front sight and the suspect will be blurred, and you will lose attention on the suspect or their movements.
The Commands
To eliminate confusion, one officer should give all commands, which you should practice repeatedly to make them instinctive during the stressful situation of a high-risk arrest. Commands should be spoken loudly, clearly, and concisely. Loud, clear, and concise commands are imperative in today's society, where everything is being recorded; take away all doubt should deadly force be required. While you may choose your own commands, here are some recommendations to practice.
- "Get your hands up." ("higher," if necessary)
- With the suspect's arms extended, you will more likely spot a weapon at the beltline or somewhere on the upper body.
- You may also choose to have the subject slowly turn completely around into view of the entire beltline and upper body.
- The arrestee should be facing the officers prior to your asking the arrestee to drop to the prone position.
- If there is a weapon visible, say, "I see the weapon. If you reach for it, I will shoot."
- "Keeping your hands away from the weapon, away from your waist, go down to your knees."
- "Keeping your hands away from the weapon, away from your waist, go down on your stomach."
- As the arrestee is going onto their stomach, command, "Arms out, arms out."
- "Palms up."
- "Cross your ankles."
- Officers should communicate about who will control and cuff and who will maintain cover. Whichever officer cuffs, command the arrestee to turn their head in the opposite direction. For example, if the control and cuffing officer approaches to cuff on the arrestee's left side, the officer should command, "Look to your right."
 Officers should communicate about who will control and cuff and who will maintain cover.Photo: Michael Schlosser
The Approach
The cover officer should work their way to the cuff and control officer, who should holster their pistol and wait until the cover officer has come alongside before approaching the suspect. The cover officer should keep their pistol drawn, finger on the locator and pointed at the suspect, ready to take a shot at the head or upper torso should the need arise. The two officers should approach together, side by side, to prevent the contact officer from being flagged or covered by the cover officer's muzzle (a "crossfire" situation).
Control, Cuff, and Secure Weapon
Having arrived beside the arrestee, the control officer should maintain control of the suspect by securing the arrestee's arm at the wrist and elbow. Standing in a good base, apply upward pressure on the wrist and downward pressure at the elbow. It is important for the arrestee's hand to face palm-up.
While maintaining this pressure, mount the arrestee by placing your shin across the suspect's back and controlling the arm, enabling pain compliance with gooseneck control at the wrist. Should the arrestee begin to resist, maintain control by driving the arm downward and apply pain compliance through the wrist manipulation. That said, no tactics work every time; be aware that the control officer may need to disengage.
Once the control officer has mounted the arrestee, the cover officer should keep their pistol at the low ready, pointing toward the ground, off the suspect's head or upper torso area. The cover officer should stand at the same angle as the cover officer's leg closest to the suspect's head to allow a safer transition should they need to bring their pistol up for use. This will help keep them from covering their partner with the pistol and keep the control officer from being shot should the cover officer swing their pistol too far side to side.
The control officer must maintain control by placing the first cuff on the arm they are controlling. After the first cuff is on, while maintaining control, the control officer should ask the arrestee to slowly place their other hand behind their back. The control officer should then grab ahold of the arrestee's hand before it reaches the arrestee's body.
After handcuffing the suspect, the control officer should search the area near the arrestee's hands to make sure no other weapons are within reach.
The control officer should then ask the arrestee if they are OK and can breathe. Even though the suspect is under arrest, their safety is the responsibility of the arresting officers. The officer should then check the cuffs for proper fit and double-lock them.
The officers can then retrieve the weapon safely. As a rule of thumb, secure a suspect prior to taking a weapon from them. However, circumstances dictate tactics, and sometimes officers need to change strategy and tactics. There is no such thing as a "never" or "always" when it comes to police tactics.
After the weapon has been secured, the contact officer should complete a thorough and systematic search. This can be done with the arrestee prone, kneeling, or standing, or all three to be sure.
Other Considerations
Make the arrest at the safest possible location. Ideally, officers would find cover and then order the arrestee to the location behind cover.
If there is another threat, the cover officer will have to focus their attention both on the other possible threat and the arrestee. Ideally, a third officer would be available to focus on other potential threats while two officers perform the high-risk arrest.
Dr. Michael Schlosser, Ph.D., is the director of the University of Illinois Police Training Institute, and the Institute's lead control and arrest tactics instructor. He retired from the Rantoul (IL) Police Department as a lieutenant.
Sgt. Ken Palmer of the Livingston County (IL) Sheriff's Office works as the master firearms instructor and master control tactics instructor at the University of Illinois Police Training Institute.


